In an Intermediate workflow purchase invoices are sent to different users (checkers) based on their supplier, before ending up at one user who approves the invoices for payment. Additionally, you may use an approval limit for some of your users.
Setting up Routes
In everyday practice
An administrative employee (role: Post) processes the purchase invoices in the Validation screen. After the invoices are posted, they are sent to manager 1 (role: Check), unless the purchase invoices are from supplier A or B. In that case, the purchase invoices should be sent to manager 2 (role: Check).
Both managers check their own invoices and perform the action Agree. Now, the invoices are sent to the same managing-director (role: Approve payment)
The managing-director performs the action Approve for payment if all information on the invoice is correct. Subsequently, the purchase invoices become payable in the accounting system.
Once the invoices are paid, they will automatically be moved to the archive in the Blue10 service.
In the Blue10 service
The purchase invoices are processed in the Validation screen. After an invoice is saved in the Validation screen, an autoroute is activated which Posts the invoice and Blocks it for payment (route A). The invoice will receive an Entry number.
Using two autoroutes, the purchase invoices will be sent to the managers after they have been posted. The purchase invoices will now become available at the step Approve in the Blue10 service. All purchase invoices will be sent to manager 1 (route B.1), unless they are from suppliers A or B. If so, they will be sent to manager 2 (route B.2).
The managers check if all information on the purchase invoices is correct and perform suggested routes. These suggested routes include the action Agree and send the purchase invoices to the managing-director (route C.1 and C.2).
The managing-director can perform the action Approve for payment (route D). The purchase invoice will now be de-blocked for payment (route E) and become payable in the accounting system. Simultaneously, it becomes available on the Payable list in the Blue10 service. As soon as the Payment date is received from the accounting system, an autoroute will perform the action Send to the Archive (route F).
You can find these routes and where they are situated in the Blue10 service in the diagram below.

How to set-up in the Blue10 service
Here you can find how the process described above can be set-up using routes in the Blue10 service.
Overview autoroutes
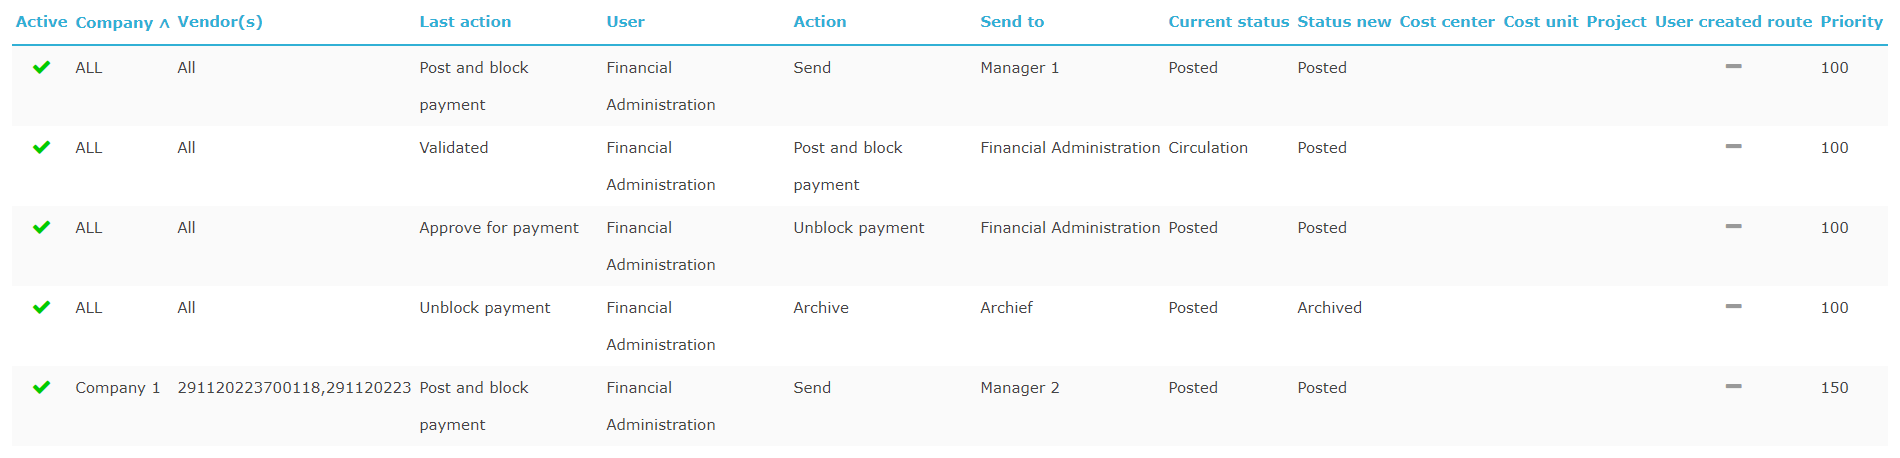
Route A is included in our default set-up. Go to Settings > Autoroutes and create the following route (route B.1):

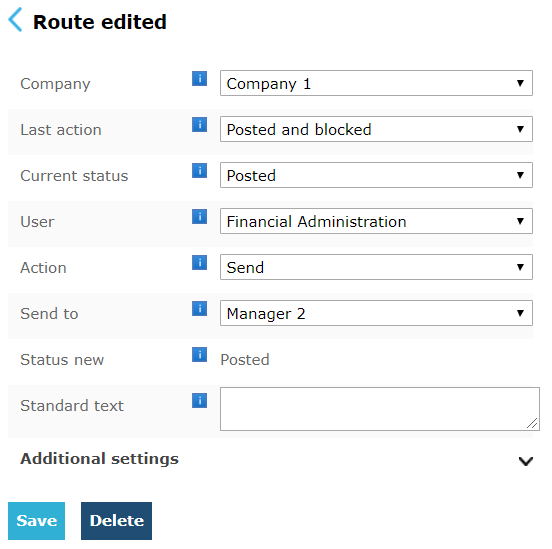
In addition, create the following route for manager 2 (route B.2):
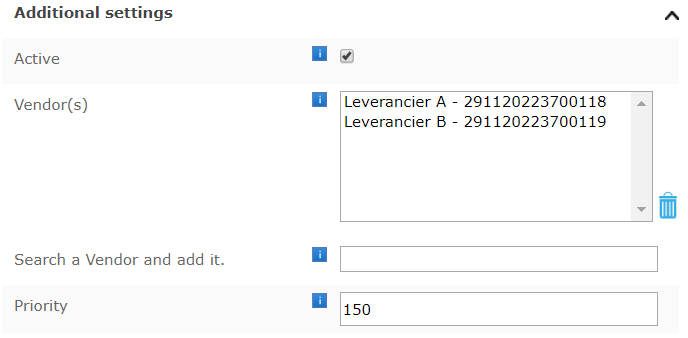
Click on Additional settings and add the supplier(s).
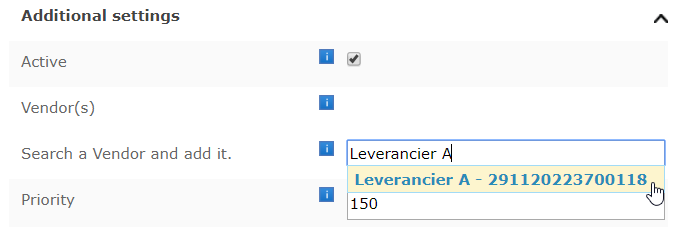
Normally, all purchase invoices will be sent to manager 1. By increasing the priority compared to the default priority of 100, you can set the system up to prefer route B.2 over route B.1.
Increase the priority of route B.2 to 150 and save the route.
The autoroute overview will look as follows:
Overview suggested routes
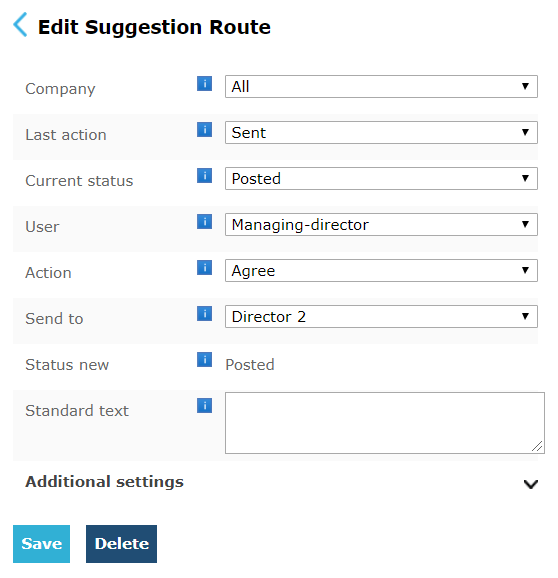
Go to Settings > Suggested routes and create the following route (route C.1):

Now create the following route for manager 2 (route C.2):
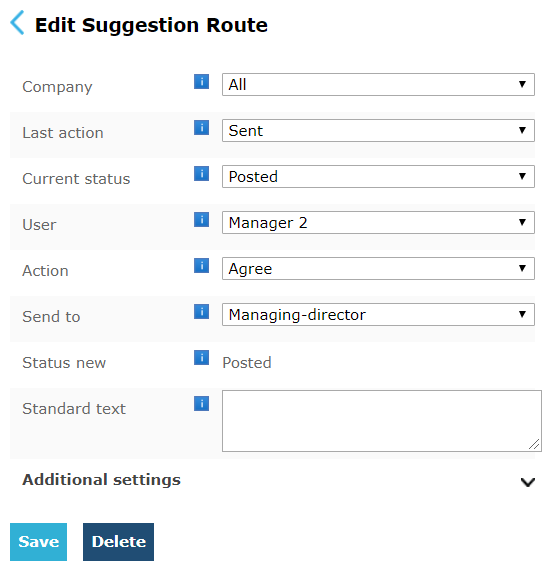
The overview of suggested routes will look as follows:

Note: Users with the role Approve payment will see the action Approve for payment by default. You are not required to make a suggested route for this.
Route E and F are included in our default set-up. You are not required to create these routes manually.
Adding an approval limit
You can set an approval limit for each user by going to Settings > Users. Before doing so, additional user settings should be activated in your Blue10 environment. Contact our Customer Support to activate this if you haven’t done that already.
Now, you can enter the desired amount in the block next to Approval limit.
Subsequently, you can add another suggested route (Route D.2):