To successfully link your AFAS administration(s) to Blue10, you must perform several steps in AFAS and Blue10. First of all, we ensure that the settings in AFAS are correct for each administration. Then we create a company in Blue10 per administration. We have divided the steps in two parts:
- Part 1: Setting up the App Connector
- Part 2: Creating a company in Blue10
Part 1: Setting up the App Connector
Via the app connector, Blue10 can connect with AFAS. To be able to connect specific Getconnectors need to be imported. Please contact our customer support to receive the Getconnector files. You can contact our customer support via support@blue10.com or 088 – 2583 101.
Follow the step-by-step plan to set up the app connector:
- Save the Getconnector files on your computer. Extract the files.
- Go to AFAS > General > Output > Settings > Getconnector.
- Click on Import > Choose file > Select file. For example:
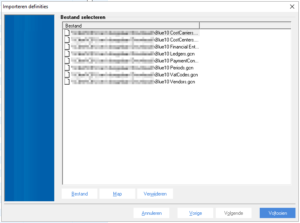
Select Getconnectoren Blue10CostCenters (dimension 1) and Blue10CostCarriers (dimension 2) and delete the dimensions if you don’t work with it. The other Getconnectors are mandatory. - Click on Complete.
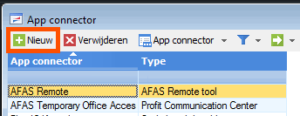
To set up the App Connector, go to:
- AFAS > General > Settings > Appconnector.
- Click on New.
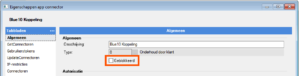
- Enter the name in the description field. For example: ‘Blue10 connection’.
- Click on Complete.
- You will see the following screen. Uncheck this box.
- Go to the Getconnector tab in the left column:
- Click on New
- Search in the Selectionwizard for Blue10
- Check all the boxes of the Blue10 Getconnectors.
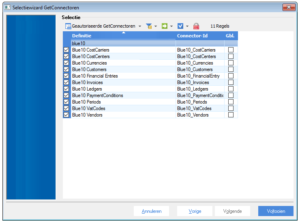
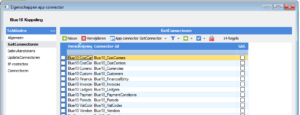
- Click on Complete. The Getconnectors are now visible in the app connector for the Blue10 connection.
- Click on the tab UpdateConnectors in the left column:
- Click on New.
- Add the following UpdateConnectors by checking the following ID’s and click on Complete:
- FiEntries
- FiInvoice
- KnPurchaseRelationOrg
- KnSalesRelationOrg
- KnSalesRelationPer
- KnSubjec
- FbPurch
- KnOrganisation
- The Updateconnectoren are now visible in the App Connector.
- Click on the tab User tokens and follow the next steps:
- Click on New
- Choose a user that has rights in this environment and enter a description
- Click on Next. You will see the following screen.
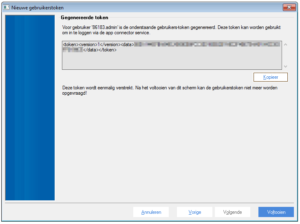
- A token will be generated. Copy the code that you see between <data> and </data> and paste this to Blue10.
- Make sure to save the Token, you will not see the token in AFAS again. Click on Complete when you are ready.
- Resume to part 2 when all settings are correct in AFAS.
Part 2: Create a company in Blue10
To be able to create a financial entry in Blue10 and post invoices, you need to connect Blue10 to AFAS. In Blue10 you can create a company to link Blue10 to the relevant administration in AFAS. Your suppliers, and all masterdata will be retrieved from AFAS so you can use them in Blue10.
Follow our step-by-step plan to create a company in Blue10:
- Go to Settings > Companies and click on New Company. An overview of the available integrations will now open.
- Select the accounting system AFAS and click on Connect.
- Enter the name of the administration and click on Submit. This name is visible to all users in Blue10.
Check the following settings:
-
- Administrationcode: Fill the code of the administration as given in AFAS. Standard, it is the code in the last column in the administration screen.
- API-token: Fill the API token generated for the Blue10 connection. After inserting the token, these will be changed to 15 dots, this is correct.
- Member nummer: Fill your AFAS member number. This consists of 5 numbers visible in the header of the AFAS window. Only fill the numbers, not the letters in front or after the member number.
- Export pdf to AFAS: The PDF can be attached to the invoice in AFAS. Set to Yes if you would like the PDF of the invoice with the booking in AFAS..
- Purchase journal: Fill the purchase journal number the purchase invoices should be posted in.
- Default GL account: The GL account on with the VAT amount will be booked, will be taken from the VAT code that is used. Fill this field with the GL account you would like the VAT amounts posted on for the VAT codes that have no standard GL account given.
- Codeer op cost centre / cost unit: AFAS has multiple dimensions. Blue10 connects dimension and dimension 2.
- Dimension 1 to YES to code on cost centre
- Dimension 2 to YES to code on cost unit
- Click on Save.
- Open the administration once again and click on Update all suppliers and Update all Masterdata to sync all data from AFAS.
