When dealing with an invoice, you can indicate which follow-up action a user can take. These actions may be carried out manually for each invoice, but it is also possible to set recurring actions in a route. Routes show you relevant suggestions to assist you or even allow you to (partially) automate your process. In other words – setting up routes saves you time and ensures you fewer manual interventions are needed.
Types of routes
You can add two types of routes in Blue10:
- Auto route: An autoroute is an action that Blue10 automatically performs without the intervention of a user. You can only use an autoroute when that action has to be carried out in all cases and the user no longer needs to see the invoice.
An example of this is the automatic posting and archiving of invoices after they have been paid. - Suggested route: A suggested route is a suggested action for a user. The user must still carry out this action on each invoice and has the option to deviate from the suggestion.
An example of this is the approval of an invoice whereby an approver receives the suggestion ‘Approve for payment’ by default. The user still has to carry out this action but can also has the option to deviate from this suggestion if the invoice is incorrect.
Creating Routes
It is possible to create a route in two ways:
- Via Invoice overview> by opening an invoice. Each user can create a suggested route by placing a checkmark on Suggested Route and then executing the action. Users with administrator rights will also see the Auto Route checkbox here.
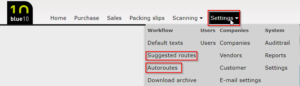
- Via Settings> Suggested Routes or Auto Routes. A user with administrator rights can create, modify and change routes via the administration.
In the case of a suggested route, a user receives a suggestion, while with an auto route, Blue10 automatically executes the action. To work with Blue10 as efficiently as possible, a user can create a suggested route that shows the Approval and To a specific user by default with a possible comment
Creating route via User
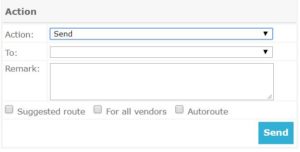
We explain how creating a suggested route works for each user using an example. We created a suggested route for approving invoices. By default, a controller sees the following with an open invoice via the invoice overview:
The user must adjust the Action from Send to Approve and then click Send. In order to work with Blue10 as efficiently as possible, the user can create a suggested route that shows the Approval and To a specific user by default with a possible comment.
Follow the steps below to create a suggested route
- Open an invoice that is ready to be processed via the Invoice overview.
- In the Action heading, enter the desired actions for the open invoice:
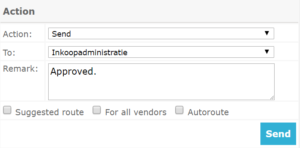
- Action: In the case of approving an invoice, the Action: Approval.
- To: In the case of approving an invoice, To would indicate a specific user who can approve the invoice.
- Comment: You can place text in the Comment.
- Route: Tick at Route, Suggested Route. A tick on Suggested Route means that the suggested route applies to the relevant administration and one specific supplier.
Take Note: A tick at for all suppliers means that the suggested route applies to the relevant administration and all suppliers within this administration.
- Click Send to activate the suggested route and perform the appropriate action. You will see the suggestion on the next invoice from the relevant administration and supplier.
Create route via Settings
We explain how creating an autoroute in the Settings works using an example. We created an autoroute where the invoice is automatically sent to a specific user after posting and blocking.
Follow the steps below to create an autoroute (also applies to suggested routes):
- Go to Settings > Auto Routes.
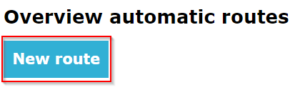
- Click New Route.
- Move through the fields from top to bottom to create the route step by step:
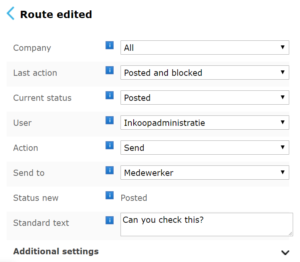
- Company: Indicate whether the route applies to all administrations/ companies or for one administration/ company.
Take Note: In the All companies option it is not possible to set up the route on the basis of supplier, cost center or project.
- Last action: Enter the last action taken on an invoice before the route starts.
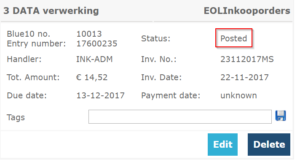
- Current Status: Enter the current status in which the invoice is located when the route has to start. The current status can always be found in the head of the invoice:
- User: Select here the user where the invoice is at that moment, so to whom the Last Action was performed.
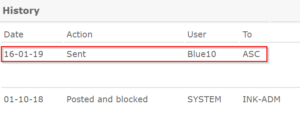
Tip: In the history of an invoice you will find the previous action (Last action) and the user with whom the invoice “sits” at that moment (Located at). See the data that is red in the image.
Take Note: Read the actions in the history from bottom to top.
- Action: Select here the action that Blue10 should perform automatically (in case of an auto route) or fill in the action that Blue10 should give as a suggestion (in case of a suggested route).
- Send to: Select the user to whom you want to carry out the action.
- Status new: Blue10 automatically fills the new status of the invoice when the action is executed. This is a direct result of the previous status and the action to be performed.
- Standard Text: Optional: Enter the text that is visible when this route is executed in the Comment field and the History of an invoice.
- Company: Indicate whether the route applies to all administrations/ companies or for one administration/ company.
- Click Save to activate the route. After saving, the route is immediately active, even for already scanned invoices.

Routes based on characteristics
In the Settings> Suggested routes or Auto routes it is possible to set routes based on certain characteristics or conditions. If you click on Additional settings after completing the standard fields when creating a route in the Settings (see above example), it is possible to enter characteristics as supplier(s), cost center(s) or project number(s) and conditions.
Often it is not necessary to set conditions, because the Last action is restrictive enough. It is possible in certain cases to carry out the route on a condition.
For example, it is possible to set an invoice to have the ‘Paid’ attribute before it is archived.
To set up the route, open the relevant route via Settings> Auto Routes or Suggested Routes. You can only set a route for each specific administration based on one of the following characteristics:
- Routes based on supplier(s)
In order to add suppliers to the route, you have to choose a specific company for which the route applies. Then click on Additional settings and add the relevant supplier(s) in the Search a Vendor and add it field. By typing the first letters of the name or the first digits of the supplier’s number, suggested appear and you can select the supplier to add it. The supplier will then appear in the Supplier(s) field. This way you can add all suppliers for which the route applies. - Routes based on cost center(s)
At the top, choose a specific company for which the route applies based on cost center(s). Then click on Additional settings to set Blue10 to automatically send invoices that relate to a particular cost center to the relevant user. Select Cost Center for this. You can choose one cost center per route.
Take Note: With this option, Blue10 looks at the cost center of the first line of the invoice lines and matches it accordingly.
- Routes based on project
Select at the top a specific company for which the route applies on the basis of project(s). Then click on Addtional settings to set Blue10 to automatically send invoices relating to certain projects to the relevant user. In the field Project Codes, enter all project numbers (comma separated space).
Giving priority to a route
Every route has a certain priority. It is possible to adjust the priority of a route so that a route has priority over a similar alternative route. This way you do not have to ‘exclude’ suppliers from a route. You then create a route with a slightly higher priority for the supplier with a different route so that this route is preferred for this supplier. The other route that applies to the other suppliers will then receive a lower priority. Under the Additional settings you can give the desired Priority to the Priority field. The default priority is 100. A route with priority 125 will be higher than priority 100 for example.
Route status
Routes can have different statuses. This allows you to see at a glance whether a route is being used or still needs extra attention.
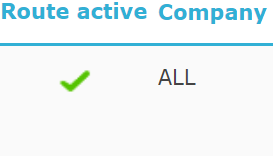
- Active routes: active routes are marked with a green check.
- Inactive routes: inactive routes are indicated with a red cross.
- Routes with an error: routes with errors are indicated with an orange exclamation mark.
A route can be marked as an error in various situations:
- The user or group for which the route was created is no longer active. In that case, the route is no longer applied.
- The only value in an advanced field is no longer valid. For example: the route is linked to one specific general ledger account, but that general ledger account is no longer active. In that case, the route is no longer applied.
- One of the values in an advanced field is no longer valid. For example: the route is linked to multiple general ledger accounts, one of which is no longer active. In that case, the route will still be applied.
