Via Settings > Companies various settings are adjustable per administration. Some settings in Blue10 are environment settings, and are therefore not adjustable per administration. You can find these settings via Setting > Settings. Keep in mind that settings you change here apply to all administrations/companies in Blue10 and to all users.
Document splitter settings
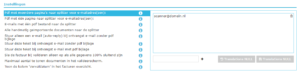
The first settings regard the documents entering the document splitter. The first settings relate to the documents entering the document splitter. By default, all documents go straight to the Validation screen, unless it is an e-mail containing multiple PDF files. In addition, the settings below allow you to choose to process even more documents via the Split screen. Read more about the different options in the document splitter blog. This affects the following four settings:
- Pdf with multiple pages to splitter for email address(es):
A supplier may send a single PDF file consisting of multiple pages and possibly multiple invoices. Setting up the e-mail address of this supplier(s)/user(s) will bring the PDF file into the document splitter where it can be split into multiple invoices. This can also apply to other senders, such as the scanner. The easiest way to scan paper invoices is to scan them all at once and send them to Blue10. By setting the sending e-mail address of your own scanner, scanned PDF files will also end up in the document splitter. - One-page Pdf to splitter for email address(es):
Furthermore, it is also possible that emails with a single-page PDF file from certain senders end up in the document splitter. This allows you to change the document type (purchase invoice, sales invoice or packing slip) and administration in the document splitter. Of course, this can also be done by setting up multiple e-mail addresses per administration.
Note: Changing the document type is only possible in the document splitter. During validation, it is not possible. - Emails with one PDF file to the splitter:
By default, e-mails with one PDF file go directly to the validation screen. If it is desired to process all incoming e-mails via the document splitter, tick this setting. - All manually imported documents to the splitter:
By default, all documents added manually via Import in Blue10 go straight to the validation screen (Start > Validate). Tick this setting if you want to process manual uploads via the document splitter.
Auto-reply settings
As soon as an e-mail arrives in Blue10 (sent by the supplier itself or forwarded by a user), Blue10 sends a success auto-reply. This auto-reply states that the e-mail has been received and is being processed in Blue10. If the e-mail from the suppliers or user does not contain a PDF file, the sender receives an auto-reply stating that the e-mail cannot be processed and asking to send the PDF file again. This is affected by the following settings:
- Send e-mail (auto-reply) after receiving an e-mail without pdf attachment:
Check this setting to not send a confirmation e-mail to the sender. The sender will then receive an e-mail only if no PDF file is found in the received e-mail. This applies to e-mails sent by suppliers as well as e-mails forwarded internally.
Uncheck this setting to do send a confirmation e-mail to the sender that the e-mail with PDF file attached was successfully received in Blue10.
Validating settings
The following settings apply to the validate screen:
- When validating, save the invoice only if all data are 100% conclusive:
In the validation screen (Start > Validate), all imported documents are listed on the left-hand side. Each document has an orange tick or a green tick. An orange check mark indicates that the header data has been completely filled, but the coding is not yet conclusive. A green tick indicates that the header data is completely filled and the coding is conclusive. By default, it is possible to save documents with a green and an orange tick in the validation screen. For a document with an orange tick, the encoding can be closed later. Check this setting to make it impossible to save documents with an orange checkmark. A document can then only be saved when the encoding is conclusive. This way, you avoid invoices having to be encoded afterwards. In combination with an autoroute that books invoices automatically after validation, we recommend ticking this setting. - Maximum number of documents to be displayed in the validation screen:
By default, a user sees a maximum of 10 documents in the validation screen (Start > Validate). This allows another user to validate any other documents at the same time. If it is desired to load more than 10 documents simultaneously in the validation screen, it is possible to adjust the number here.
Note: The user who sees the documents in the validation screen blocks them from other users so that only one user can validate the document. Other users only see the documents when you, the user, exit the validation screen.
Settings in the invoice overview
The following setting relates to the invoice overview (Invoices/Import in the menu):
- Show ‘expiration date’ column in the invoice view: Set this setting to ‘On’ to add the Expiration date column to the invoice overview. It will then be displayed next to the invoice date.
Note: This column is immediately visible on all users.
